
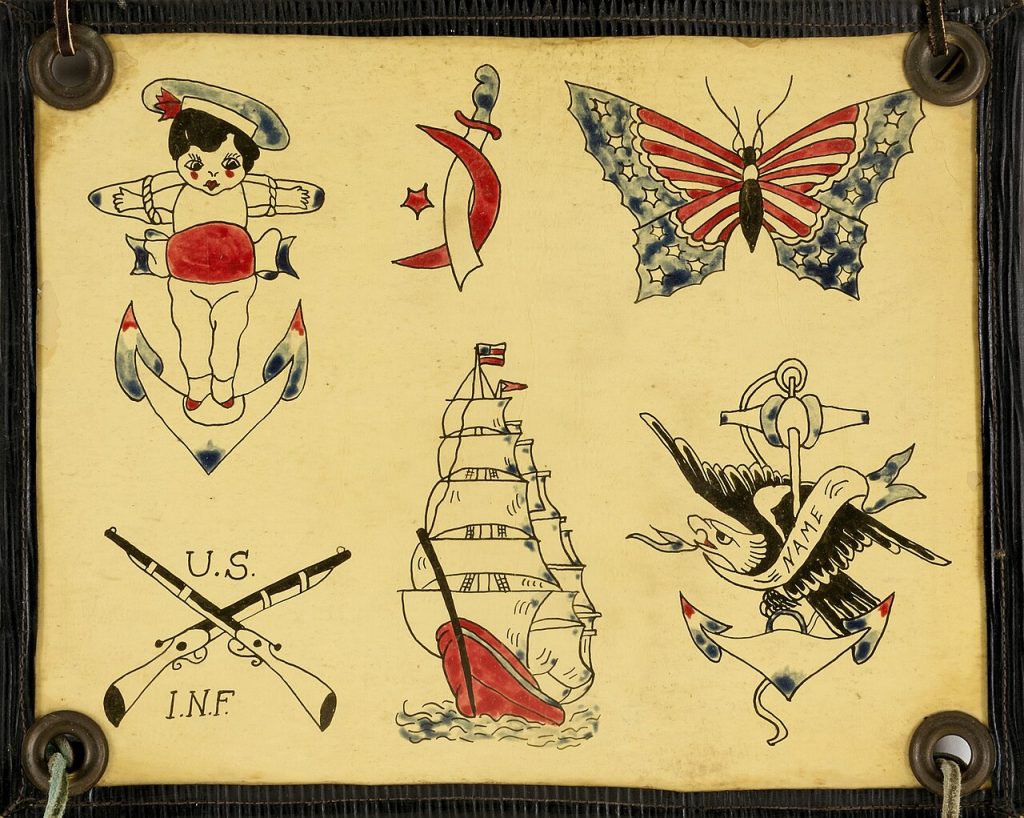
Nobody wants a tattoo that looks great on screen and strange on a forearm. That gap between a flat drawing and a three-dimensional body is why tattoo templates exist. They help you size a design, see how it sits on a curved surface and hand a clear reference to the person who will actually do the work. This guide explains the common types, how to use them sensibly and why the final decision should always involve a professional.
Three kinds of template
People use the phrase for quite different things, so it is worth separating them.
- Flash sheets are pages of ready-made designs, traditionally pinned to a shop wall, that a client can choose from.
- Body placement templates are outlines of an arm, back, ribcage or leg on which you can sketch to test size and position.
- Stencil templates are the transfer artwork, printed on special paper, that the artist applies to the skin as a guide.
Only the third is a working tool during the appointment. The first two are planning aids.
Why placement outlines are useful
A design that is four inches wide feels huge on a wrist and tiny on a back. A simple outline of the body part, scaled to a realistic size, lets you draw the idea in place and notice problems early. Long, narrow designs suit forearms and calves, while rounder pieces sit better on shoulders and thighs. You can even print the outline and tape the design on for a day to see how it feels.
Working with a flash sheet
Flash is a wonderful way to choose a style, but remember that the sheet is an artist’s own work. Copying someone else’s flash without permission is poor form and can be a copyright problem. If you love a design, ask the artist if it is available, or ask them to create something inspired by your idea. Many artists happily adapt flash to your size and placement.
Preparing your own reference
If you want to bring your own sketch, keep it simple. Use clean black lines on a white background, show the size you want and add notes about colour. Include two or three reference images for mood and style, not for copying. Artists generally prefer a clear brief and room to redraw it to suit skin, flow and healing.
Line weight and detail
Skin is not paper. Very fine lines and tiny text can blur over the years, so designs with generous spacing age better. A template with a scale bar is helpful here: it reminds you that a detail which looks bold at A4 may be too delicate at two inches. Ask your artist what minimum line weight they trust.
Safety and hygiene come first
A template is a drawing, not a service. Choose a licensed studio, look at healed work in the artist’s portfolio and ask about their hygiene practices before booking. Follow aftercare instructions closely, and see a doctor if you notice signs of infection. Never try to tattoo yourself or friends based on a printable stencil, because skin penetration carries real health risks. If you are under the legal age in your country, the answer is simply to wait.
Temporary options
If you only want to test the look, temporary transfers and skin-safe markers let you wear a design for days. Print your template on transfer paper designed for skin, follow its instructions and patch-test first for sensitivity. This is a good trial run for anything large or symbolic.
Using the template as a design file
Designers who produce tattoo-style artwork for merchandise, posters or stickers use the same structure: a clean outline, defined line weights and a scale. If you plan to print your artwork onto labels or apparel, the notes in our sticker templates guide on bleed and cut lines transfer well. For an artist building a portfolio site, our walk-through on how to choose a website template shows what to look for in a gallery layout.
Choosing the right size
Size is the thing most people get wrong. A good rule is to print your design at the exact size you imagine and hold it against the body for a few minutes, in the mirror and from a distance. Look at it from the side too, because arms and legs curve. If you hesitate, go slightly bigger for detailed pieces, since small intricate work loses clarity as skin changes with time. Share the printout with the artist, who can then suggest adjustments.
Cultural and personal meaning
If your design uses symbols, scripts or traditional motifs, research their meaning before committing. A phrase in a language you do not speak should be checked with a native speaker, and sacred imagery deserves respect. Good artists will happily discuss this with you, and they often have useful suggestions on how to adapt a concept so it feels personal rather than borrowed.
Summary
Treat templates as planning tools: use placement outlines to test size, flash sheets to explore style and stencils only through a licensed artist. Keep your reference clean, respect other artists’ work and put health first. For general background on the craft, see tattoos at Wikipedia.

Written by thadmin_r7
The Templates Hub editorial team writes practical, plain-English guides for everyday readers.
More articles by this author →
Nail Templates: Stencils, Guides and Printable Shapes Guide
If you have ever tried to paint a clean French tip freehand, you already know why nail templates…
Router Templates for Woodworking: Make Reusable Jigs
Router templates are simple guides that let a woodworker cut the same shape again and again. A well-made…
Avery.com Templates: Finding and Using Label Layouts
www.avery.com templates explained: match your product number, pick the right layout, set up the print and avoid common…

Infographic Templates: Tips to Make Data Easy to Read
Infographic templates let you present facts, steps and comparisons as pictures that people actually finish reading. Rather than…