
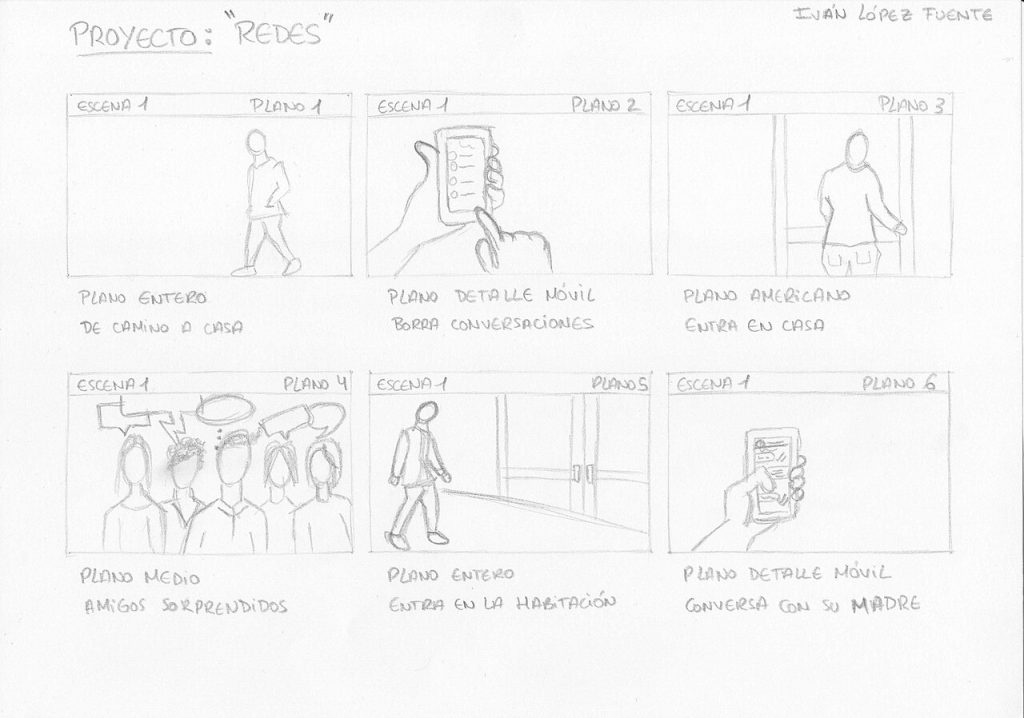
A storyboard is the cheapest rehearsal a video can get. Instead of discovering on set that two shots do not connect, you find out on paper in ten minutes. That is the whole point of storyboard templates: a pre-drawn grid of panels, with space underneath for what is said and what the camera does, so you can think in shots rather than staring at a blank page.
Why a grid helps even if you cannot draw
Many people avoid storyboards because they assume stick figures will embarrass them. They will not. A storyboard is a communication tool, and clarity beats polish every time. A circle for a head, a rectangle for a laptop and an arrow for a camera move can carry a scene. The template supplies the structure, and the structure is what keeps a team aligned.
The parts of a good template
Look for these elements, and add them if they are missing.
- A frame in the correct aspect ratio, 16:9 for most video and 9:16 for vertical clips.
- A line under each frame for dialogue or voice-over.
- A second line for action, so you can describe what moves.
- A small box for shot type, such as wide, medium, close-up.
- A number for each panel, so the order is never a debate.
Horizontal or vertical?
This depends on where the video will live. Traditional film, YouTube and presentations use landscape frames. Short-form social platforms favour tall frames, and if you draw landscape panels for a vertical project, you will compose shots that get cropped. Pick the template that matches the final format from the start. If you work across both, keep two versions on hand.
How many panels do you need?
One panel per meaningful change, not one per second. A thirty-second advert might need six to ten panels, while a two-minute explainer could use fifteen to twenty. If a scene is a single continuous take, one panel with arrows showing movement is enough. Resist the urge to fill every box just because it is there.
A simple workflow
1. Write the script or bullet outline first. 2. Split it into beats, where something new happens. 3. Sketch one panel per beat. 4. Add the line of dialogue under each panel. 5. Note camera movement and any sound cues. 6. Read the whole sheet aloud and check the timing.
Reading aloud is a habit worth keeping. It exposes slow sections quickly, and it often shows that a shot you loved is simply not needed.
Using storyboards for different jobs
For an advert, the storyboard doubles as a client approval document. Clients who cannot picture a video can react to panels, which prevents expensive changes later. For animation, it becomes the backbone for timing, and animators often build an animatic from it by placing the panels on a timeline with a rough soundtrack. For social clips, a loose storyboard makes it easier to film in batches, since you can see which locations and outfits repeat.
Digital or paper
Paper is fast and forgiving. Digital templates, whether in a slide app or a graphics tool, make sharing and revising simple. A common hybrid is to sketch on paper, photograph the panels and drop them into a digital layout with the text typed in. If you already work with presentation software, you may find our guide to templates for Google Slides useful, since a slide with a frame and two text boxes is effectively a storyboard page.
Common mistakes
Over-drawing is the first one: spending an hour on a single panel defeats the purpose. The second is ignoring the audio line, which leads to videos where the picture is planned and the sound is an afterthought. The third is skipping continuity notes, such as which hand holds the prop. A short note in the margin saves a reshoot.
Where to go next
Once your boards are done, convert them into a shot list and a schedule. If you are producing for platforms with fixed formats, our overview of video templates covers how ready-made timelines can speed up the edit. For anyone planning outreach videos, email marketing for beginners shows how to bring the finished clip to an audience.
A few practical extras
What if I need to show movement?
Use arrows, and keep them simple. An arrow inside the frame shows how a subject moves, while an arrow outside the frame shows a camera pan, tilt or push-in. If movement is complicated, draw a start panel and an end panel and write “moves from A to B” underneath. Nobody on set will be confused by that.
How do I share the board with a team?
Export it as a PDF and add page numbers, so everybody can refer to “panel 14” in a call. If several people comment, keep one master version and rename it each time you change something, for example with a date. A single, clearly named file prevents the classic mix-up where half the crew shoots from last week’s version.
In short
Use a template that matches your final aspect ratio, draw only what matters, add the words and the camera notes, and read it aloud. For historical background on the technique, the entry on storyboards at Wikipedia explains how it began in animation studios.

Written by thadmin_r7
The Templates Hub editorial team writes practical, plain-English guides for everyday readers.
More articles by this author →
Popular Video Editing Templates and How to Make Them Yours
Watch any tidy short video and you will notice something repeated: the title slides in the same way,…

Meme Templates: Where to Find Them and How to Caption Well
A meme only works when the picture and the caption click in the same second. That is why…
Social Media Templates: Build a Consistent Content Look
Posting regularly is hard enough without redesigning every image. Social media templates solve this by giving each post…

Live Photo Templates for TikTok: How to Use Them
Live photo templates for TikTok let you turn the short moving pictures from your iPhone into a quick,…